I learned to pack a backpack the hard way: twelve miles into a loop trail in the Cascades, my shoulders were on fire and I kept stopping to dig through the whole bag just to find my rain jacket. The pack was a 50-liter bag, same volume I use today. The problem was not the bag. The problem was that I had crammed everything in without a system. Everything sat wrong. The heavy stuff was too far back, the soft stuff was nowhere near my spine, and things I needed every hour were buried at the bottom. One miserable trip will teach you what no gear guide fully conveys: packing order matters more than pack size.
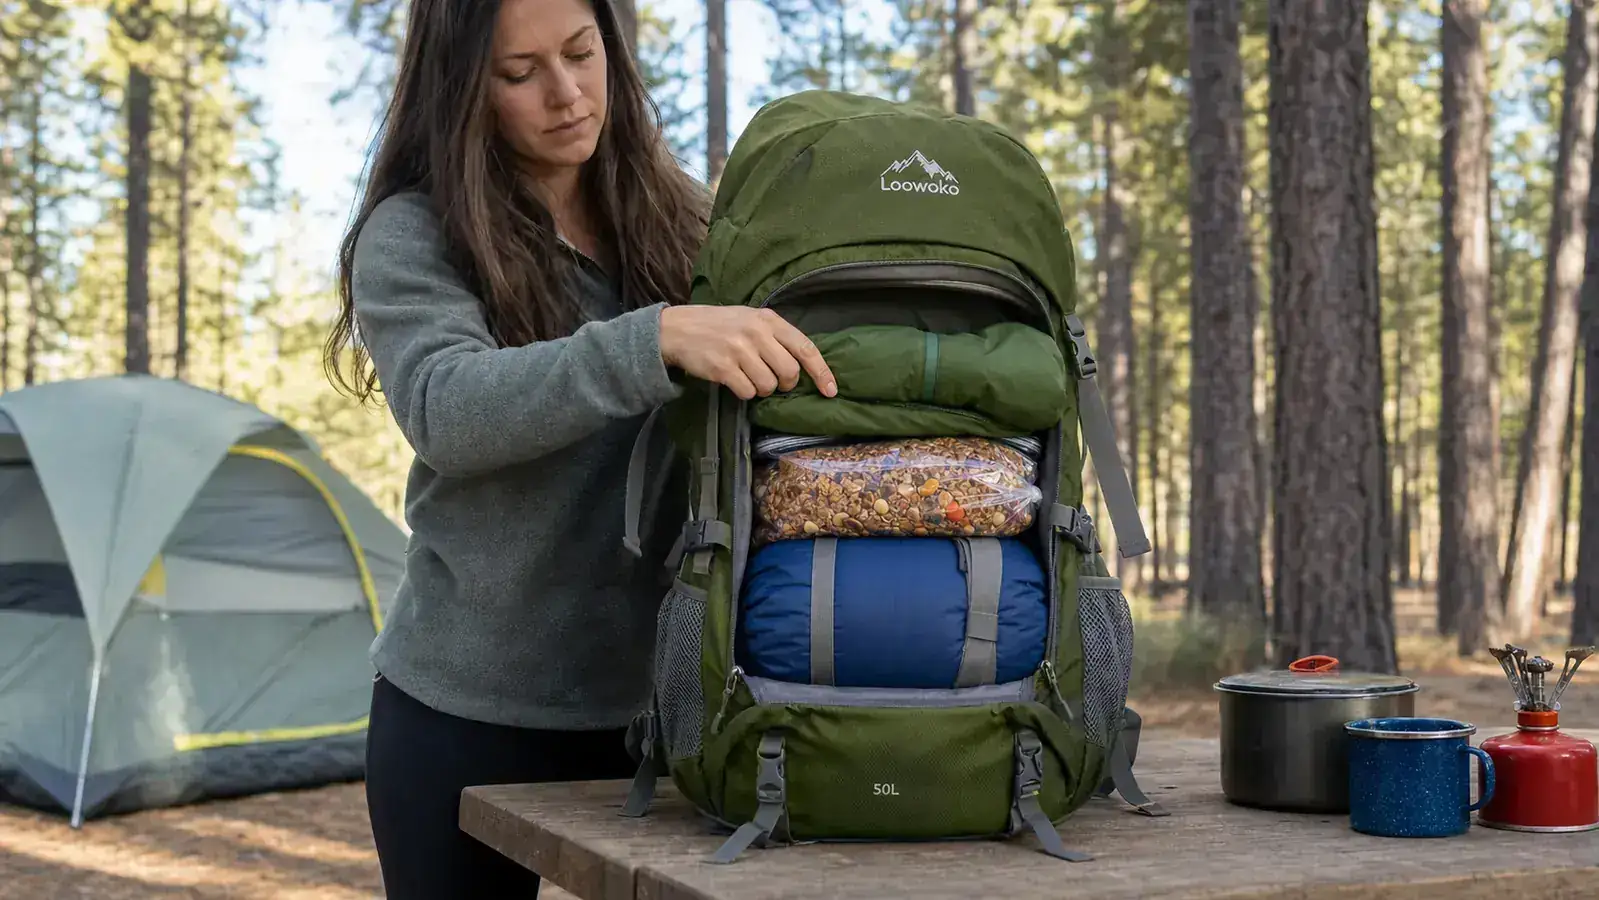
Since then I have settled on a four-zone loading method I run every single time I head out, whether it is a one-night hammock trip or a three-day circuit with a full shelter kit. I do it with the Loowoko 50L Hiking Backpack, which has the right pocket layout for this system and handles two to three nights of camping gear without issue. The steps below are laid out in packing order, bottom to top, so you can follow along as you load.
Your pack is only as good as what's inside it. The Loowoko 50L gives you the space and the pockets to run this system right.
Waterproof construction, an internal frame, a removable rain cover, and enough volume for a full weekend kit. Check current availability on Amazon.
Amazon Check Today's Price on Amazon →Before You Pack: Lay Everything Out
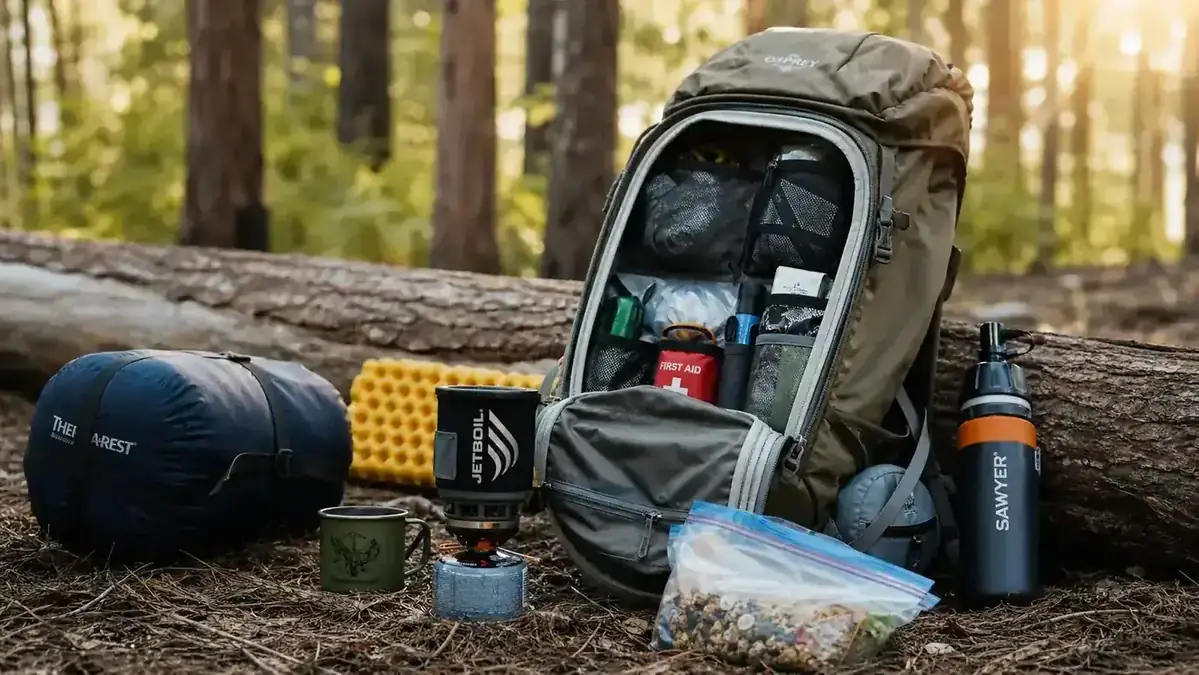
Spend five minutes doing a gear dump before you load a single item. Lay everything out on a table or your tailgate. This is not ceremony, it is function: you will catch the water filter you forgot, you will drop the third pair of socks you did not need, and you will actually see the weight distribution problem before it is on your back at mile eight. Separate your gear into rough categories: shelter and sleep, clothing, food and water, cook kit, first aid and navigation, and trail snacks and accessories. Once you can see all of it, the four zones below make intuitive sense.
Step 1: Bottom Zone, Soft and Bulky Low-Priority Items
The bottom of your pack is the foundation. It should hold soft, bulky gear that you will not need until you reach camp and stop moving. Your sleeping bag goes here first. Compress it into its stuff sack and push it all the way to the floor of the main compartment. If you carry a sleep pad that fits inside the pack, roll it around the interior perimeter of the main compartment so it acts as a frame and frees up the center for the rest of your load. A pair of camp shoes, a puffy jacket you will not touch until evening, and a set of dry camp clothes in a light drysack round out the bottom zone.
The bottom zone is deliberately low priority because accessing it mid-trail is rare. You are not pulling out your sleeping bag at noon. Keeping heavy or rigid items out of here also protects you: if you take a fall, a hard stove canister at the base of the pack can drive into your lower back. Soft wins at the bottom, every time.
One note on the Loowoko 50L specifically: the main compartment runs clean with no internal divider, which means your sleeping bag can sit low without being blocked by a shelf you have to fight. The bottom compartment zipper on similar packs is absent here, and that is actually useful because you control the bottom zone yourself rather than having the bag force a boundary.
Step 2: Core Zone, Heavy Gear Against Your Spine
The core zone sits directly behind your shoulder blades, from mid-back up to the tops of your shoulders. This is where you want your heaviest, most dense items, loaded as close to your spine as possible. The physics are simple: weight centered near your body's own center of gravity transfers cleanly through your hips and legs. Weight hanging far from your spine acts like a lever, pulling you backward and loading your lower back instead of your legs.
In practice, this means your water reservoir or water bottles go right against the back panel. If you carry a two- or three-liter hydration reservoir, most packs with a hydration sleeve, including the Loowoko, position that sleeve exactly where you want it: flat against the back panel, high in the main compartment. Your food bear canister or bear bag, if you carry one, your cook pot, your stove canister, and your first aid kit all belong in this central zone too. Heavier items closest to your back. Slightly lighter items in front of those, toward the outside face of the main compartment.
If your tent poles are in a stuff sack, slide them vertically along the spine of the pack. They are relatively heavy and they run parallel to the pack frame, which is exactly where vertical load belongs. The tent body and footprint, rolled or stuffed into a compression sack, go in front of the poles. The tent rainfly, which is usually the lightest piece, fills gaps or moves to a side pocket.
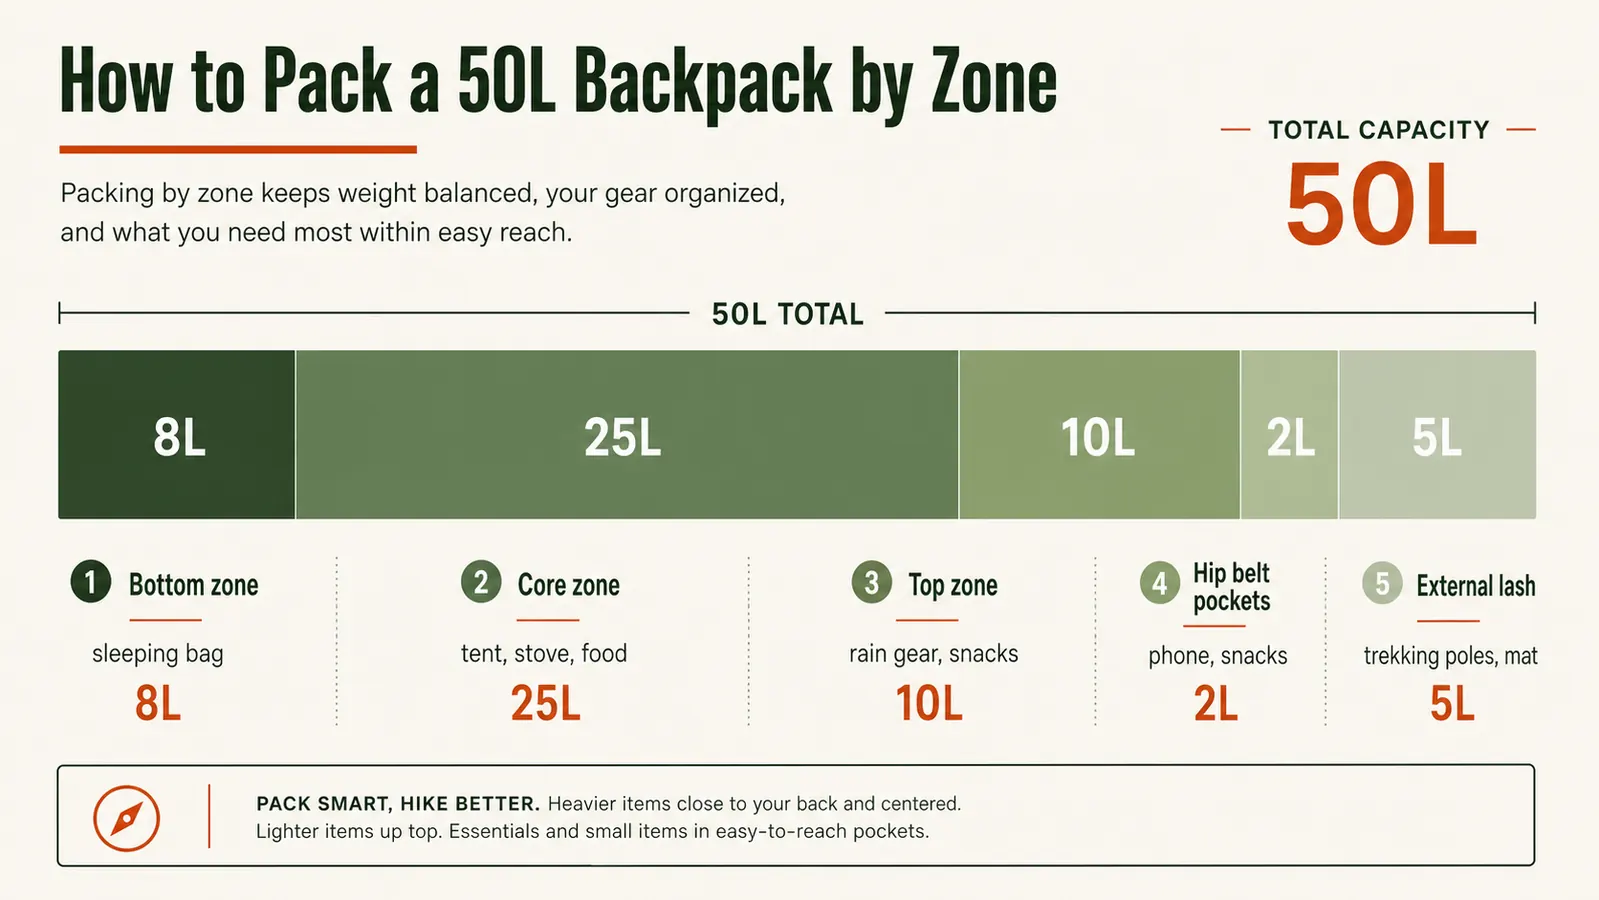

Step 3: Top Zone, Frequent-Access Items and Layers
The top zone is the upper third of the main compartment plus the top lid pocket if your pack has one. Load here anything you will reach for on the trail without stopping to dig: your rain jacket, an insulating mid-layer, your first aid kit if you prefer it accessible over heavy-positioned, your map and compass or GPS, a headlamp, and your water filter.
The rain jacket rule is non-negotiable in my book. Weather changes fast, and I have watched people tear through a fully loaded pack in a downpour trying to find a jacket that was crammed at the bottom under their sleeping bag. Rain jacket goes at the top. No exceptions. Same logic applies to your headlamp if you are doing any dawn or dusk hiking. You do not want to dig for light.
The Loowoko 50L has a top lid pocket that sits above the main compartment, accessed from a separate zipper. That lid pocket is well-sized for a folded map, a lighter, a small first aid kit, and your phone in a waterproof sleeve. Use it. It is the most-accessed zone on any hiking day, and having a dedicated pocket for it keeps the main compartment sorted even after a hundred miles of use.
Rain jacket at the top, sleeping bag at the bottom. Everything else follows weight and how often you reach for it. Get those two rules right and the rest takes about ten minutes to figure out.
Step 4: Accessory Pockets for Hip Belt, Shoulder Straps, and Side Pockets
Most 50L packs, including the Loowoko, have three external pockets outside the main compartment: two side mesh pockets and a front zippered pocket. Some models also have hip belt pockets. Load these intentionally or they become clutter traps.
Side pockets are for water bottles. A one-liter bottle on each side keeps water accessible without stopping. If one side pocket holds a filter or a collapsible cup instead, that is fine, but keep the weight roughly even left to right. An asymmetrical side load will pull you off balance on a sidehill trail. The front zippered pocket on the Loowoko is the right size for snacks, sunscreen, bug spray, and a folded piece of toilet paper in a small bag. Anything you touch every thirty minutes belongs in an external pocket. Anything else goes in the main compartment.
If your pack has hip belt pockets, use them for snacks and your phone. Hip belt pockets keep weight low and centered, which is the right place for small, dense items like energy gels, nuts, or a multi-tool. They also let you eat without stopping, which adds up over a long day.
Step 5: Fit and Final Compression Before You Head Out
Packing order gets the load right. Fit adjustment turns a correctly loaded pack into one that actually feels good. Once everything is in, put the pack on and run through the adjustment sequence: first tighten the hip belt so it sits on your iliac crest, which is the bony shelf at the top of your hips, not your waist. Then pull the shoulder straps snug, not tight. Then pull the load lifter straps, the short straps that angle from the top of the shoulder straps up to the top of the pack frame. They should form roughly a 45-degree angle when correctly adjusted. Finally, clip and lightly snug the sternum strap across your chest.
The most common mistake I see is overtightening the shoulder straps and under-using the hip belt. The hip belt should carry 70 to 80 percent of the load. Your shoulders stabilize the pack, they do not carry it. If your shoulders are sore after an hour, loosen the shoulder straps slightly and retighten the hip belt. The load should feel like it is sitting on your hips, not hanging from your shoulders.
Last check: use the side compression straps to cinch the load tight. A loose main compartment lets gear shift as you walk, which throws off your balance and makes the pack feel heavier than it is. Compress the load until the pack feels solid when you give it a lateral shake. The Loowoko 50L has compression straps on both sides, and cinching them takes ten seconds. Do not skip it.
What Else Helps Your Pack Ride Better
Three things beyond packing order will make a real difference on a long day. First, distribute clothing strategically: soft clothing items stuffed around the edges of the main compartment act as padding that protects fragile gear, fills dead space, and prevents shifting. Second, keep your rain cover accessible. The Loowoko 50L comes with a rain cover stored in a bottom pocket. Know where it is before it starts raining, not after. Third, if you carry trekking poles, attach them to the outside of the pack using lash points rather than stuffing the handles down a side pocket. They ride more securely and your hands stay free.
On weight, the target for a three-season weekend trip is a base pack weight under 25 pounds total including food and water. Most weekend campers carry far more than they need. After you do the gear dump in Step 1, cut one thing from every category except safety and shelter. You will feel the difference by mile three. The Loowoko 50L at 50 liters is sized just right for a two-night trip if you pack with discipline. Going bigger tends to mean bringing more, which means carrying more, which means hurting more.
The Loowoko 50L is built for exactly this system: hydration sleeve at the back panel, clean main compartment for zone loading, and a rain cover already included.
4.5 stars from over 5,600 campers. Waterproof fabric, internal frame stays, padded hip belt. A solid weekend pack at a fair price.
Amazon Check Today's Price on Amazon →